How to Lock iPad to One App for Streamlined Device Usage

Locking an iPad to one app can be incredibly useful across various scenarios, from creating a distraction-free learning environment to transforming the device into a dedicated kiosk for business purposes. This article explores two effective methods to achieve this: using the built-in Guided Access feature and leveraging VantageMDM for advanced customization and control.
Why Lock an iPad to One App?
Restricting an iPad to a single app ensures that users focus solely on the task or purpose intended for the device. Some common use cases include:
- Education: Keeping students focused on educational apps.
- Retail: Running a point-of-sale app or customer-facing kiosk.
- Healthcare: Ensuring medical staff access only specific healthcare applications.
- Entertainment: Restricting app usage for toddlers or young children.
These use cases highlight the importance of reliable methods to lock an iPad to one app effectively.
Method 1: Lock iPad to One App Using Guided Access
Guided Access is a built-in feature in iPads that allows you to restrict the device to a single app. It’s a straightforward and efficient way to lock down the iPad without requiring third-party tools.
Steps to Enable Guided Access
- Enable Guided Access:
- Go to Settings > Accessibility > Guided Access.
- Turn on the Guided Access toggle.
- Tap Passcode Settings to set a passcode that will allow you to exit Guided Access.
- Start a Guided Access Session:
- Open the app you want to lock on the iPad.
- Quickly press the Home or Power button three times to activate Guided Access.
- Adjust settings as needed (e.g., disable certain screen areas or buttons).
- Tap Start in the top-right corner to begin the session.
- Exit Guided Access:
- Triple-press the Home or Power button.
- Enter the passcode you set earlier.
- Tap End in the top-left corner to exit Guided Access mode.
Benefits of Using Guided Access
- Ease of Use: Ideal for quick setups and temporary use cases.
- No Additional Tools Required: Built into the iOS system, eliminating the need for third-party apps.
- Basic Accessibility Options: Disable touch in specific screen areas or physical buttons for enhanced focus.
Limitations of Guided Access
While Guided Access is a fantastic feature for individual users or small-scale scenarios, it lacks advanced customization and scalability for enterprise-level needs. For organizations or businesses that require granular control, VantageMDM offers a more robust solution.
Method 2: Lock iPad to One App Using VantageMDM
For organizations managing multiple iPads, VantageMDM is an excellent tool for locking devices to a single app with iPad kiosk mode feature. It provides centralized control, advanced configurations, and seamless deployment, making it the go-to solution for businesses and institutions.
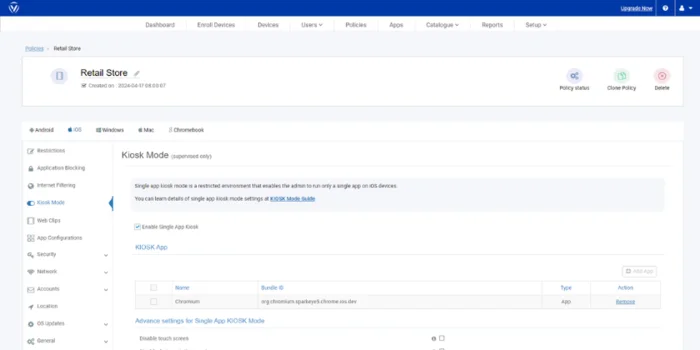
Steps to Lock iPad to One App with VantageMDM
- Log into the VantageMDM Dashboard:
- Access the VantageMDM web console and navigate to the Policies section.
- Navigate to iOS Kiosk Mode:
- Under iOS, select Kiosk Mode.
- Click on Enable Single App Kiosk to activate the one-app mode setting.
- Choose the App:
- Select the app you want to lock the iPad to. You can choose from any installed app or assign an app remotely from the VantageMDM console.
- Configure Advanced Settings:
- Adjust settings for accessibility, such as enabling guided navigation or specific accessibility shortcuts.
- Fine-tune other configurations, including display options, network restrictions, or auto-launch on reboot.
- Save and Publish the Policy:
- Click Save to finalize your configuration.
- Assign the policy to the desired iPads.
- Once the policy is deployed, the iPad will automatically lock to the selected app.

Benefits of Using VantageMDM
- Centralized Management: Manage all devices from a single dashboard.
- Scalability: Ideal for businesses, schools, or institutions managing a fleet of devices.
- Advanced Features: Customize accessibility settings and deploy policies remotely.
- Security: Prevent unauthorized changes by locking down device settings.
Limitations of VantageMDM
- Initial Setup: Requires VantageMDM enrollment and initial configuration, which may take some time.
- Subscription Cost: While VantageMDM provides robust features, it involves a subscription fee, making it less suitable for individuals or small-scale users.
Comparison of Guided Access and VantageMDM
Choosing the Right Method
The choice between Guided Access and VantageMDM depends on your specific needs:
- For Personal or Temporary Use: Guided Access is ideal, especially if you need a quick and easy solution for a single device.
- For Business or Enterprise Needs: VantageMDM is the better choice, offering scalability, advanced settings, and centralized management.
Use Cases for Locking iPads to One App
- Educational Institutions:
- Ensure students stay focused on a specific app during lessons or exams.
- Guided Access is suitable for individual classroom devices, while VantageMDM is the perfect MDM for schools to manage multiple devices for educational purposes.
- Retail Environments:
- Lock iPads to point-of-sale or customer feedback apps.
- VantageMDM’s advanced settings allow you to control kiosk-specific features and branding.
- Healthcare Facilities:
- Restrict iPads to electronic medical record (EMR) apps to enhance patient privacy and staff efficiency.
- VantageMDM ensures secure, HIPAA-compliant configurations.
- Corporate Training:
- Use iPads as dedicated training tools with access to a single learning app.
- Both Guided Access and VantageMDM can be employed depending on the scale.
Locking an iPad to one app is a practical way to streamline device usage for various purposes. While Guided Access offers a simple and free solution for individuals or small-scale scenarios, VantageMDM stands out as the ultimate tool for organizations and businesses requiring centralized control and advanced features. By understanding your specific needs, you can choose the method that best aligns with your goals and enhance productivity, focus, and security in your operations.