How to Whitelist a Website or Multiple Websites Remotely
Restricting access to a pre-approved list of websites, known as website whitelisting, is essential for many organizations. Website whitelisting allows IT administrators to permit access only to trusted sites, reducing the risk of employees visiting harmful or distracting websites. This practice is invaluable for organizations prioritizing security, productivity, and compliance, especially in industries like finance, healthcare, and education where strict data protection policies are in place.
Effective website management has become a priority for businesses with distributed teams in today's remote-first environment. Managing internet access at a central level ensures that employees, regardless of location, work within a safe online ecosystem that limits exposure to malware, phishing sites, and other online threats. Whitelisting also enables organizations to maintain focus on business tasks by minimizing distractions that commonly arise from open internet access.
This guide provides both browser-based whitelisting techniques, which are suitable for individual or small-scale needs, and a comprehensive Mobile Device Management solution using VantageMDM. VantageMDM is ideal for remotely managing multiple devices across various platforms, allowing administrators to enforce consistent and scalable policies for secure browsing across the organization.
What is Website Whitelisting?
Website whitelisting is a security measure that restricts internet access to a specified list of approved, trusted websites. By implementing a whitelist, organizations can control which websites their employees or users can access, blocking any that are not pre-approved. This selective access minimizes the risk of malware, phishing, and other online threats by ensuring that users only visit sites that have been verified as safe and relevant to their work. Unlike blacklisting, which blocks harmful sites, whitelisting takes a more restrictive approach by only allowing specific sites and blocking everything else.
Whitelisting is often used in settings that require strict internet controls, such as businesses, educational institutions, and healthcare organizations. It promotes productivity by limiting distractions and provides an added layer of data security, especially for industries that deal with sensitive information. Whether it’s managed on individual devices, browsers, or through centralized Mobile Device Management (MDM) solutions, whitelisting is a proactive way to create a secure online environment tailored to an organization’s needs.
Browser-Based Whitelisting Methods for Chrome
Without an MDM solution, Chrome’s settings and third-party extensions can enable simple whitelisting on individual devices. Here’s how:
1. Using Chrome’s Built-in Settings
Chrome’s settings allow users to control site permissions by enabling or blocking features like JavaScript, pop-ups, and cookies on specific sites:
- Step 1: Open Chrome settings by clicking the three dots in the top-right corner.
- Step 2: Select "Privacy and Security," then "Site Settings."
- Step 3: Under categories like "JavaScript," "Cookies," and "Pop-ups," you can add specific websites to the "Allow" list.
This process creates a site-specific experience, enhancing functionality on whitelisted sites.
2. Using Browser Extensions
Extensions like AdBlock or uBlock Origin offer more control over which websites can run ads or scripts. After installing one of these extensions:
- Step 1: Click on the extension icon in Chrome's toolbar.
- Step 2: Go to the extension’s settings.
- Step 3: Add desired websites to the whitelist section.
This solution is effective for blocking unwanted content on non-whitelisted sites.
3. Editing the Hosts File
For more advanced users, editing the system’s hosts file enables control over website access:
- Step 1: Locate the hosts file (typically in C:WindowsSystem32driversetchosts on Windows or /etc/hosts on macOS).
- Step 2: Open the file with administrator rights.
- Step 3: Add entries mapping specific URLs to their IP addresses.
Changes here apply at the system level, allowing you to block or allow websites across applications.
Whitelisting Websites Using VantageMDM
For organizations managing multiple devices, VantageMDM offers a centralized method to remotely whitelist websites across various operating systems. The following steps outline how to configure whitelisting for Android, iOS, Windows, and macOS devices.
Configuring Website Whitelisting on VantageMDM
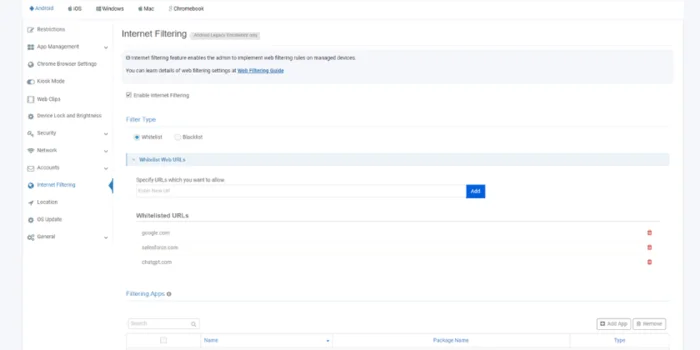
How to Whitelist Website(s) on Android Devices
- Access Policies: Log in to the VantageMDM console and go to Policies.
- Select Android and Internet Filtering: Under the "Android" section, click on Internet Filtering.
- Enable Filtering: Toggle "Enable Internet Filtering" to turn it on.
- Choose Whitelist Mode: Select "Whitelist" to allow only approved sites.
- Add URLs: Input the list of URLs you wish to whitelist.
- Save and Publish: Save changes and publish the policy to enforce it on the selected Android devices.
Chrome-Specific Whitelisting for Android:
- Enable Chrome Browser Settings in the Internet Filtering menu.
- Add URLs specific to Chrome, then save and publish.
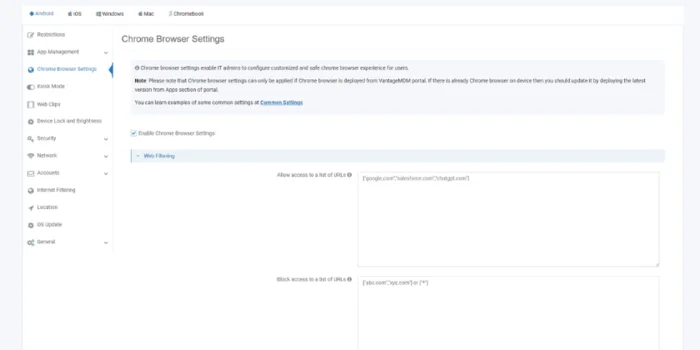
This Android setup provides a controlled browsing experience, limiting users to approved sites.
How to Whitelist Website(s) on iOS Devices
- Navigate to Policies: Access the VantageMDM console and select Policies.
- Select iOS > Internet Filtering: Click on "Internet Filtering" under iOS.
- Enable Internet Filtering: Toggle on Internet Filtering for the device.
- Choose Filtering Mode: Decide between Device Wide or Chromium Browser filtering.
- Add URLs for Whitelisting: Select "Whitelisting" and enter the allowed URLs.
- Save and Publish: Save your settings and publish the policy.
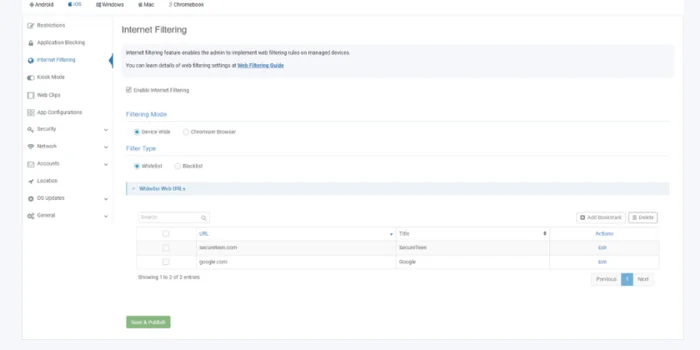
For iOS, VantageMDM provides flexibility in choosing the scope of whitelisting, applying policies either device-wide or only within certain browsers.
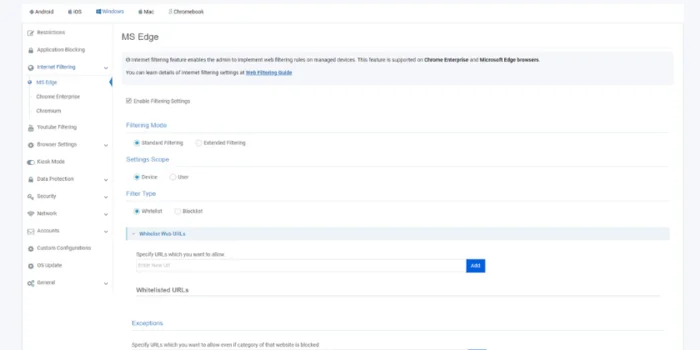
How to Whitelist Website(s) on Windows Devices
- Open Policies in VantageMDM: Under Policies, go to the Windows section.
- Enable Filtering for MS Edge, Chrome Enterprise, or Chromium: Enable filtering settings for the preferred browser.
- Choose Filtering Mode and Scope: Configure the desired mode and specify the scope.
- Add Whitelist URLs: Enter the list of approved websites after selecting the "Whitelist" option.
- Save and Publish: Save changes and publish the policy.
With VantageMDM, Windows devices can enforce browser-specific whitelists, allowing or restricting access based on defined URLs.
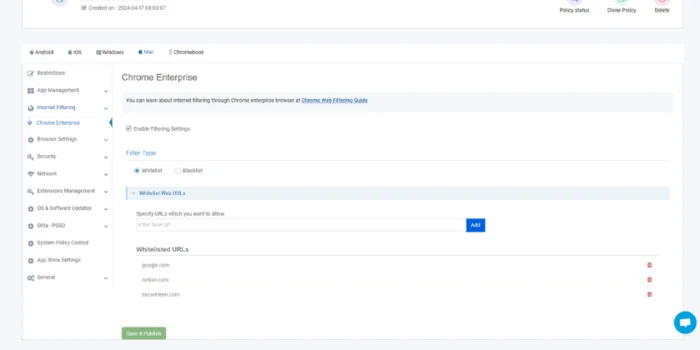
How to Whitelist Website(s) on macOS Devices
- Access Policies: In the VantageMDM console, go to Policies and select the Mac section
- Enable Filtering for Chrome Enterprise: Choose "Internet Filtering" and enable Chrome Enterprise filtering settings.
- Select Whitelist Mode: Set the filtering mode to "Whitelist."
- Add Approved URLs: Input the list of URLs.
- Save and Publish: Save and deploy the settings.
This configuration ensures that macOS users are limited to pre-approved websites, streamlining productivity and security.
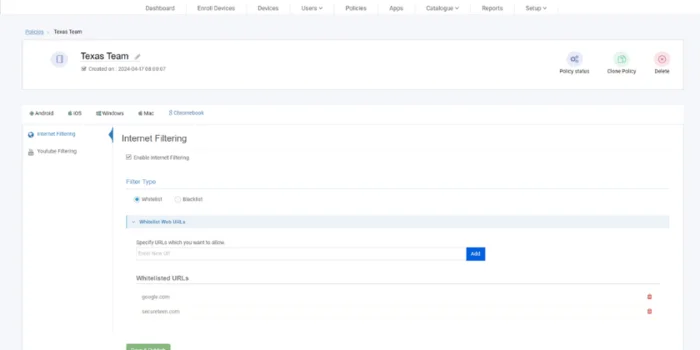
How to Whitelist Website(s) on Chromebook Devices
- Access Policies: In the VantageMDM console, navigate to Policies.
- Select Chromebook and Internet Filtering: Under the "Chromebook" section, click on Internet Filtering.
- Enable Internet Filtering: Toggle the setting to "Enable Internet Filtering" to activate filtering controls.
- Choose Whitelist Mode: Select the "Whitelist" option to allow access only to specific websites.
- Add URLs: Enter the list of approved URLs that users will be able to access.
- Save and Publish: Once you’ve configured the whitelist, save and publish the settings to apply the policy to the Chromebook devices.
Benefits of Using VantageMDM for Website Whitelisting
Implementing whitelisting policies via VantageMDM offers several advantages:
- Centralized Control: IT administrators can configure, monitor, and enforce policies across all devices from a single console.
- Enhanced Security: Limiting access to approved websites reduces the risk of malware, phishing, and other online threats.
- Improved Productivity: With restricted browsing, users stay focused on work-related tasks, avoiding distractions.
- Flexible Configuration: VantageMDM allows for both device-wide and browser-specific whitelisting, providing tailored solutions for different needs.
Website whitelisting is a vital tool for businesses, enhancing security and productivity by controlling which sites are accessible to users. While Chrome’s built-in settings and browser extensions offer simple solutions for individuals, VantageMDM provides a robust and scalable option for organizations managing multiple devices with its kiosk browser lockdown feature. By configuring VantageMDM for Android, iOS, Windows, and macOS, IT administrators can remotely enforce consistent whitelisting policies across the company’s entire device fleet.